


It’s the first thing people saw when they walked into the house, and it was a sad beige-striped color. However, I was afraid of the challenges I’ve heard came with removing wallpaper in an old house, so I left it. And then, family was coming to spend some time with us and offered to help paint. So I suddenly went to work removing wallpaper so the painting could get started. The initial stripping of the front part of the wallpaper was oh-so-rewarding. My sister-in-law and I thought it was like that wonderful moment when you peel the old skin off after a horrible sunburn that has finally healed. (I know, gross. But that’s what it felt like.) The tedious chipping away at the leftover backing was much less fun.
Of course, I made mistakes.
Removing wallpaper has now become one of my least favorite jobs, right there with cleaning toilets. But our hallway looks SO much better, and I’m so glad we made the effort to give it a new face.
If you’re planning on removing wallpaper in your house, I wish you luck and I’m glad I’m not there! I do want to share the mistakes I made in the process of removing wallpaper, though, so you don’t have to repeat them. Have fun seeing your dated wall come to life!
Here are the top 4 mistakes I made:
(I’m calling them the top 4 because I’m sure I made more mistakes than just these four!)
-
Buying materials before I figured out what kind of wallpaper I had.
A friend had told me that using a spray-on wallpaper stripper was the way to go. So David and I went to Home Depot and bought a wallpaper scorer and the bottle of stripper. Later, I stuck my thumbnail into a loose spot of our wallpaper from the 70s. A whole 8 foot strip started to come down off the wall! Our old wallpaper certainly did not need scoring–that would have just made it more difficult by creating multiple tiny pieces to tear down instead of ceiling-to-floor strips. Once I ran into a little difficulty, I got out my bottle of wallpaper stripper (after the baby was in bed with the door closed) and started spraying.
Y’all. That stuff will make your house smell like a chemical factory in about 2.5 seconds. It was horrible in the hall where I was working, even with the door open (letting in the hot, humid air of a Southern summer). All we ended up needing was warm water and rags for rubbing the stuck places. I can still return the unused scorer, but the bottle of stripper fluid is here until we can find someone who has slightly newer and better-stuck wallpaper than we did and give it to him/her.
To avoid making this mistake, try finding a loose spot on the wallpaper and tearing at it a bit.
(No loose spots? Just unscrew the plate covering your light switch–be careful around the exposed wiring–and work from the paper edges there.) If it peels off easily, you probably don’t need to score it or spray it. If it only rips off in fingernail-sized chunks, you might need to try scoring and spraying. -
Trying to tackle the whole room at once.
I sprayed and tried to dampen the whole hallway. (Thank goodness it wasn’t our whole living room!) What I didn’t know was that it’s not like your wallpaper will get juiced up and suddenly start falling down. That pesky brown wallpaper backing (which took us hours to remove from the drywall) is only easy to strip while it’s still wet. So only the last places I had sprayed were easy to peel off. My choking, stifling, gasping (can you tell I hate that stripper?) attempts were mostly in vain.
It worked so much better when we got a small section wet, pried up an edge with either a fingernail or a putty knife (being careful not to punch into the vulnerable, damp drywall), and peeled. And peeled, and peeled, and peeled some more. Removing wallpaper is no joke. I recommend getting your favorite playlist of music going and settling in for a few hours. Just work in small sections, from top to bottom. Keep a bowl of water, a washcloth/rag, and a putty knife at an easy reach.
-
Forgetting to have a big trashcan on hand.
When you are removing wallpaper, you create a gigantic mess. The strips of wallpaper, the tiny shreds of backing (unless you’re lucky and the backing sticks to the paper instead of the drywall), the splashes of water, the dust from the sheetrock. At first, the mess was just all over the floor. We finally thought to drag in our half-full kitchen trashcan. David had to take a crammed-full and almost-bursting bag out after about 10 minutes. (Also, I was constantly sweeping and mopping in case the baby woke up, since he’s at the crawling-and-eating-everything stage.)
Make your life easier and start out with a trashcan at your side that’s large enough to handle the mess. If you only have a small one, consider leaving out the bag if you have an outside dumpster where that’s ok. An open can gives you a little extra space. Or buy extra-large trash bags and hang them over the corner of your stepladder.
-
Using a too-big putty knife.
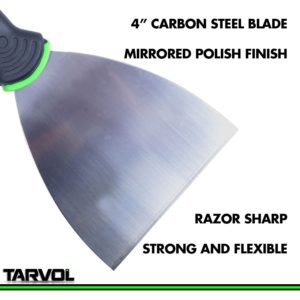
This 4 inch putty knife is a good size for the job.
A small putty knife works just right for flicking under the edges of old wallpaper. We only had one, though, so David ended up using this giant one he had in the garage. Unfortunately, as he was removing wallpaper above a doorway, he couldn’t control the knife as well and ended up gouging the dry wall a bit. However, we ended up having to texture the wall anyway because of numerous imperfections in the flat surface. So all’s well that ends well. Takeaway? It’s better to use something small and precise than to have a tool with the right name and the wrong size.

Have you already removed your wallpaper?
What are some mistakes you made in the process? What are some things that you did right? Let us know in the comments!
Are you in the process of removing wallpaper?
Good for you, taking it slow! May you have more patience in the process than I did!
You might also be interested in some furniture redo inspiration–or a love-your-home-the-way-it-is reminder, which will be published this Saturday! 🙂